
Ultimate Frisbee Drills and Games
Stop looking at ultimate frisbee drills from ten years ago and start using these updated, more effective drills and games. Whether you're a player looking to improve your game or a coach or PE teacher looking for lesson ideas, this page is for you. Here you'll find a variety of ultimate frisbee drills and ultimate frisbee games to make your practices more fun and effective!
Three Ultimate Frisbee Drills for Beginners
Throwing and catching are the main skills that beginner players need in order to be able to enjoy the sport of ultimate frisbee.
Set up game-like environments with a lot of catching and throwing reps as soon as your players can complete a basic backhand pass at 10 feet or more.
Here are games and drills we recommend for beginning ultimate frisbee players and teams.
One Way 2 v 2 - Free Start
Simple, but highly effective. This game ensures a high number of throwing and catching repetitions for each player.
View this post on Instagram
Setup for 2v2
Set up a small field or about 20 yards wide by about 30 yards deep. You can have players play until they complete a pass past the 30-yard line or set up a small end zone 5-10 yards deep if you like.
Teams are in pairs. One pair for offense, one pair on defense. One offensive players starts on the sideline, the other with the disc, is about 2.5-3 meters away on the starting line.
The player with the disc throws to the player on the sideline and then runs up line for the next pass. Defensive players can run with the offense, but the first two throws are "free" and not allowed to be blocked. From there, the defense plays regular defense.
Beginning this way allows players to have a free cut and free completions to get the disc moving. It also allows them to practice a common type of cut, the up-the-line cut.
Players attempt to complete passes and get to the line or end zone 30 meters away.
You can decrease the length of the field to 20 meters for very new players and increase the length of the field and players become more successful in this game.
If there is a turnover the repetition is over. This allows for easy setup of this drill regardless of how many players you have. They can simply make one line for offense, one line for defense and the front two people in each line step onto the field for the next rep when there has been a turnover of the previous repetition
Coaching 2v2 Free Start
After letting players try out the game for a little while, bring them into a huddle. I like to ask them what types of cuts are working for them.
I might also point out what I see - what types of cuts are creating turnovers? What types of cuts are working?
I give 1-2 suggestions of cuts to try for themselves and do the game again for a few minutes more.
I might have a second huddle to check-in and see if they were able to implement what we talked about in the first huddle.
The Space Game
The purpose of this game is to help players develop field awareness. To be successful, players need to know where their teammates are and where the disc is.
Setup for The Space Game
Set up a square or about 20x20 or 30x30 depending on how many players you have.
The Rules
One player has a disc and cannot be "out." They can run with the disc.
Everyone else maintains a space of about 10 feet between themselves and everyone else.
When the whistle blows, everyone freezes. The coach or judge decides if any players are "out" by being too close to the surrounding players. Have the player with the disc pass it or give it to someone else for the next rep.
Continue until players stop getting out. You can put everyone back in the box and go again.
Coaching The Space Game
This is a good game to play after players have tried playing a 5v5 or 7v7 game in a previous practice. In that environment, you will likely see players clumped too close together and not making space to cut into.
I like to coach this game and then do the 2v2 game afterwards.
I set up the game and tell players the rules.
Huddling up after the game I ask players what they need to do to be successful. They will usually answer correctly - look where other players are, know where the disc is. I will point out to players that since they were all pretty easily successful in the game, they know how to do this already. They know how to maintain space. And then I tell them that this spacing they already know how to maintain is the kind of spacing I'd like to see on the field.
This game is something I might do once in order to teach a concept and give players the feeling of what good spacing looks like. It's not a drill that I would use repeatedly throughout the season unless I see players starting to struggle with clumping on the field.
4 Box Keep Away
This game teaches the concept of creating space, taking space, and working together with other cutters on the field.
View this post on Instagram
Setup of 4 Box Keep Away
The field is about 30x30 yards is divided into 4 boxes marked off in cones about 15×15 yards.
Divide players into teams of 3. Subbing can be done "hockey style" with players tagging themselves in.
The rules
👉 Every three consecutive passes = 1 point.
👉 If the disc is caught with two offensive players in the same box, it's a turnover.
👉 Stall count 10, but this can be modified for different skill levels.
We played rounds of 6 minutes with one sub (hockey style subbing) per team. Intensity remained high and it seemed like a good amount of time. You can vary the length of time as desired.
Coaching 4 Box Keep Away
This game does not require much coaching. The rules encourage players to be aware of other teammates and maintain space.
In all games based coaching, look at what your players are doing. Bring them in to talk about what's working. Give tips of things they can try to increase their success rate.
Five Ultimate Frisbee Throwing Drills
These are some of my favorite throwing drills. They can be used and adapted for beginners, intermediate and advanced throwers alike. Most of these activities are simple and can be done in pairs of throwers.
1. Quick Throw Drill
This drill pushed players to catch and release the disc quickly.
Throwing partners face each other standing about 10-15 yards apart.
Set a timer for 60 seconds. Players try to complete as passes as possible in that timeframe. you can tell players to use only forehand or only backhands or specify any throw you like.
2. Aim For the Throwing Hand
This drill instructs players to throw to a very small target, the throwing hand of their throwing partner.
Players should rotate through their throws, never throwing the same throw twice.
The main purpose of this drill is to help players become more rigorous in their aiming skills. A secondary benefit is that players develop an intuitive understanding of which throws work best when aiming for a specific side of the receiver's body.
3. Fake and Throw Drill
Each throw must be preceded by a fake or pivot of some kind. While a player's throwing form may look good at a stand still, it will often break down if they do not learn how to maintain balance and start their throwing motion after a picot or fake.
4. Three Person Marking Drill
This drill helps players learn to stay calm with the added pressure of a mark. It also helps players to learn to use a variety of release points in their throws.
Players will be in groups of three. A thrower and a receiver stand about 20 yards apart. The third player marks the disc.
The order of rotation is Mark, Throw, Run. The marker becomes the thrower. The thrower runs to the person who just caught the disc and becomes the marker.
5. Break Mark Drill
This drill help players connect their pass to a receiver on the break side of the mark.
Two lines of players line up about 30 yards apart. Instead of staying stationary, the receiver makes a cut to the break side. The thrower can choose to throw to the inside break lane or wait and throw to the around break lane. This drill teaches throwers basic timing. It is normal for players to start their throw to the inside lane too late and throw behind their cutters.
The order of rotation is that the second person in line if the mark, the first person throws. After the throw the thrower becomes the cutter for the line they are facing.
Ultimate Frisbee Defense Drills
Here are some of my favorite drills for ultimate frisbee defense. These drills work on fundamentals of defensive positioning and can be used for beginners and advanced players.
Defensive Positioning Drill: Box Force Out /Force Under Drill
This drill helps players become more assertive in their defensive positioning. Beginner players have a tendency to chase the offense around the field without having much impact unless there is an errant throw. At higher levels of ultimate frisbee, players must learn to use their body to influence how the offensive players are cutting. This is often referred to as "dictating on defense."
In this drill, we are representing part of a cutting lane.
Setup
You will need 5 cones. Use 4 cones to create a box about 5 yards wide and 12 yards deep. Place an additional cone about 3 yards outside one of the short sides of the box.
Rules
Two players set up anywhere they want inside the box.
When the defense is set, the offense has two ways to win.
1. beat the defense to the front line of the box by crossing the line first
2. run past the back cone before the defense leaves the box
Coaching This Ultimate Frisbee Defense Game
This scoring system represents getting beat under versus getting beat deep. To truly be open deep, the offense needs more separation from their defender than they do if they are getting open on an under cut.
You can use different scoring systems (3 points for the front line, 1 point for the cone) to communicate different priorities.
I like to let them run the game for a few minutes with no instruction.
What you will usually observe is that players will set up beside their player, trying to cover everything. This rarely works, and they will mostly get beat underneath.
Reposition players so that they are directly between their offense and the front line to start. The goal is to maintain this positioning and make the offensive player have to work to get the underneath option. At the same time the defense needs to stay ready to pursue the offense toward the back cone to stay within range of contesting hypothetical throw.
Demonstrations of Box Force Out Drill
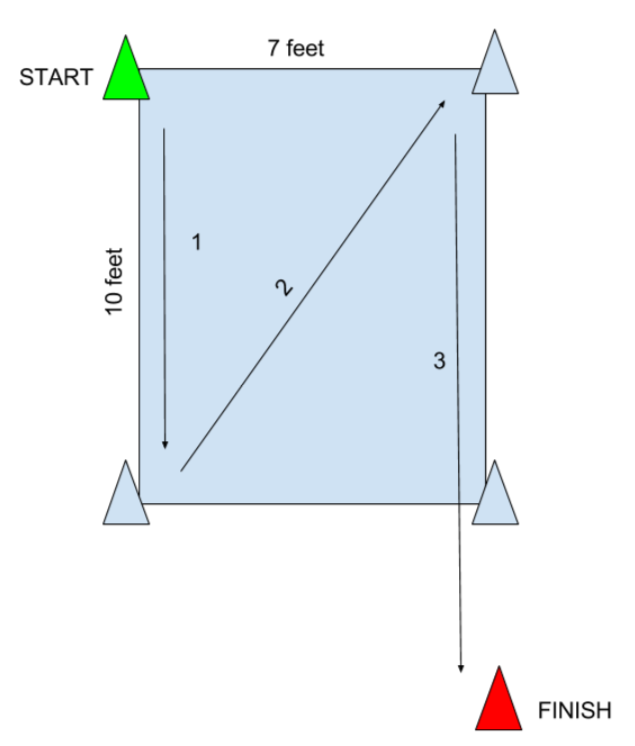
Defensive Footwork for Guarding Ultimate Frisbee Cutters: Drop Step Drill
In this drill for ultimate frisbee defense we are working on footwork and positioning against cutters who are changing direction.
The Setup
Create a box 10 ft by 7 ft.
First demo
Common Mistakes
Side view
Coaching Cues
Athletes should be reminded to stay low in the athletic position.
Advanced Ultimate Frisbee Drills
Many ultimate players and coaches think that advanced coaching is about advanced drills. But what I've found in working with elite ultimate players, is that they aren't doing fancy or new drills. There is no "secret" closet of advanced drills that nationals level teams use that they are keeping to themselves.
Instead, elite players tend to go back to the most basic of drills and do them to a higher standard. This is especially true of simple drills like the 3-person marking drill, the W-drill, and their throwing work. It's not about having some unique throwing routine, it's about returning to all of your fundamentals with a higher level of focus and a higher standard of performance against which you are measuring yourself.
Ultimate Frisbee Drills from Elite Players
Here is a sampling of drills from some of the best players and coaches in the sport of ultimate frisbee right now. You can find progressions of these drills in our UAP Skills and Technique Membership.

Defensive Footwork and Positioning Drill
From Carolyn Matthews, a variety of footwork and Defensive Positioning Drills for Ultimate.

Breaking the Mark Drill
In this drill designed by Isaac Saul, you'll use discs to extend the mark and make breaking the mark more difficult.

Cutting Drill for Ultimate Frisbee
Keith Raynor describes various types of cuts in ultimate frisbee and explains the cutting tree drill.

Marking Drills
Robyn Fennig explains how to build a better mark. These marking drills work for beginners and advanced ultimate frisbee players.

Drills for Horizontal Stack
Alex Snyder shows several drills to help players use the whole width of the field while using a horizontal stack formation .

Ultimate Frisbee Catching Drill
Learn the six different types of catches and when to use them.
Get More Ultimate Frisbee Drills!
For Players: A Program of Ultimate Frisbee Drills you Can do by Yourself or With a Partner
Designed by the best players and coaches in ultimate, this program gives you drills progressions on 14 different ultimate frisbee skills that you can do in about one hour per week. Pick the skills and drills you need, work at your own pace, cancel any time!
Get Skills and Technique!For Coaches: Everything you Need to Become the Best Ultimate Frisbee Coach You Can Be
Strategies and tactics explained by the best minds in ultimate. Plus more ultimate frisbee drills, games, and activities you can do with your team to make practices more fun and more effective. Become the kind of coach players love to play for!
Join the Coaching and Game IQ ClassroomHow to Play Ultimate Frisbee
Everything you need to know to get started! Basic rules, how to find a team, and more!
Return to How to Play Ultimate Frisbee